
Tutorial - Create a New Environment with Anaconda (Windows 10)
1. Introduction
Environments are very useful to have a set a specific version of Python and packages you need to run a jupyter notebook. There are several reasons why you would want to set up different environments:
- if some packages are only compatible with specific versions of other packages,
- if the latest version of a package is not stable
- if you work with a team of data scientists/ developers, and you want to make sure everybody works on the same versions of packages so everybody can share code and expect to run the same on other computers.
In my case, I needed the latest Tensorflow 1 environnment because such of the data explanation packages that I was using, namely SHAP, was not working properly on Tensorflow 2.
![]()
2. Create your new environment, step by step
2.1. Identify Versions
The first step is to identify the version of the most important packages you are going to need. To identify the version of a package you’re using, use the code in the following block.
import pandas
print(pandas.__version__)
1.0.1
To fetch the Python version, do as follows:
from platform import python_version
print('Python version: {}'.format(python_version()))
Python version: 3.6.10
2.2. Create the Environment and Install Packages
We now need to launch the Anaconda prompt with Administrator rights. To do that, press the Windows key on your keyboard, and type “Anaconda Prompt”. Right click on it and “Run as Administrator”. (For future uses, I strongly recommend to pin this app to the task bar and edit its properties to always start with Admin rights.)
Now open your favorite text editor and paste the following line:
conda create -n NameOfYourEnvironment python=version_of_python [list of packages with or without a version constraint]
For example:
conda create -n tf1 python=3.6 tensorflow-gpu==1.14 numpy==1.16.4 pandas numpy scipy jupyter matplotlib Pillow scikit-learn seaborn IPython
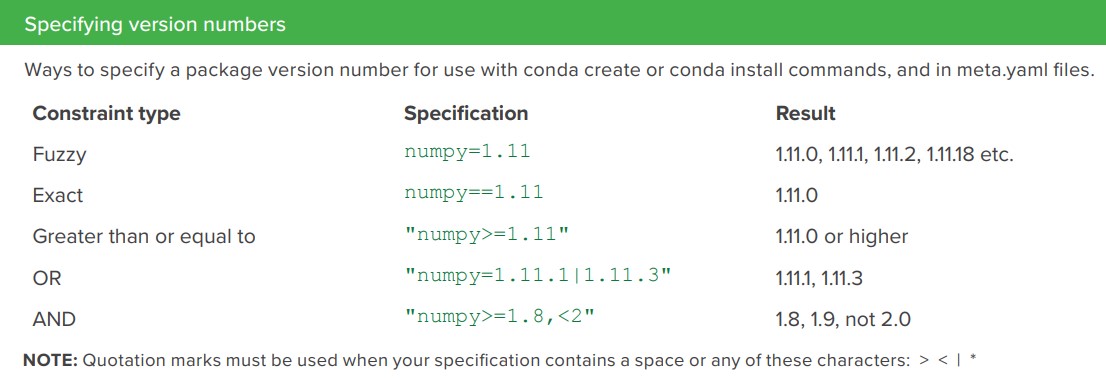
Use the name you want for your environment and specify all packages you want to force the version on first, according to the syntax shown on the image below. Also specify all packages that you are most likely going to use without their version.
Note that some packages are installed by default and you don’t need to worry about them, for instance sys, pickle and os.
Also note that other packages cannot be installed using conda. Just try all of the packages in the code above and if one or more of the packages cannot be installed, conda will let you know. Install these packages using pip by typing:
pip install package1 package2 package3 package4
For example:
pip install shap xgboost seaborn importlib
… and voila!
2.3. Use Your New Environment
To use your new environment, there is one more step to do every time. Open the Anaconda prompt and type:
conda activate NameOfYourEnvironment
and then:
jupyter notebook
That’s it!
3. Conclusion
You now know how to set up a clean environment with Anaconda. I’m using the specific environment given in the examples above to run Tensorflow 1 because some of the packages that I use are not stable with Tensorflow 2. The notebook I run using this set up can be found here.